Applying for a Vietnam e-visa is usually straightforward, but small mismatches can create stress before boarding or at the border. The safest approach is to treat the application as a document-matching task: the passport, application form, payment record, approved visa, flight or land route, and arrival plan should all tell the same story.
This Vietnam e-visa application checklist focuses on the practical gaps that broad visa explainers often leave out. It explains what to prepare before opening the official form, how to review each field, what to do after payment, and how to check your approval before travel. Rules and fees can change, so use the official portals linked in the guidance and re-check them close to departure.
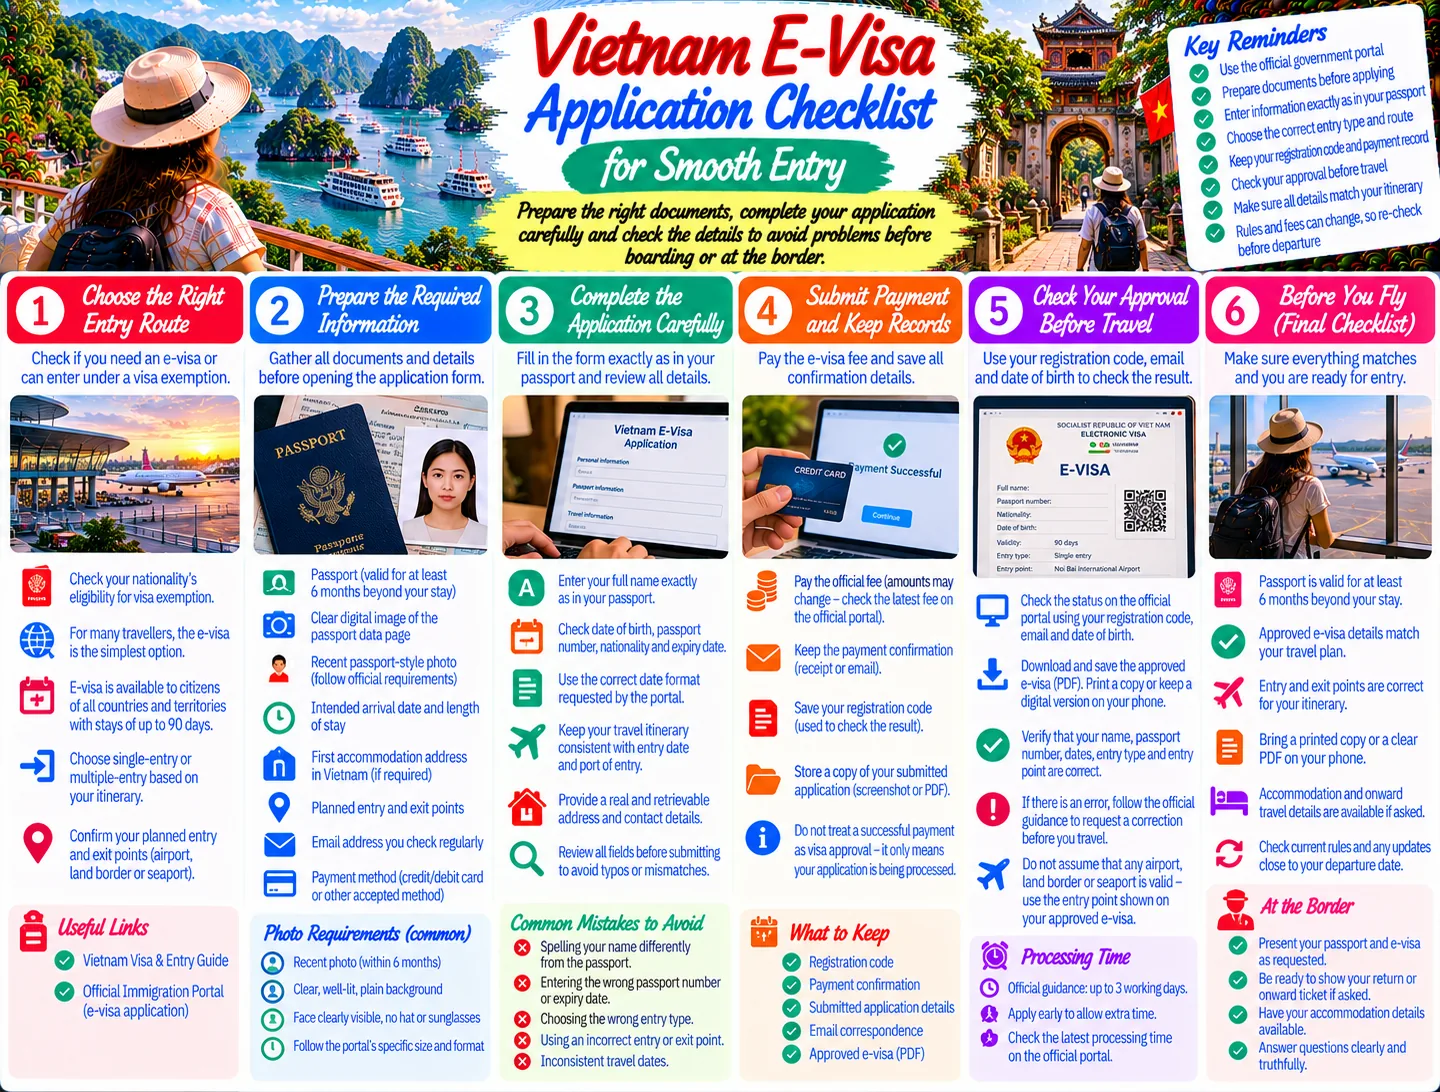
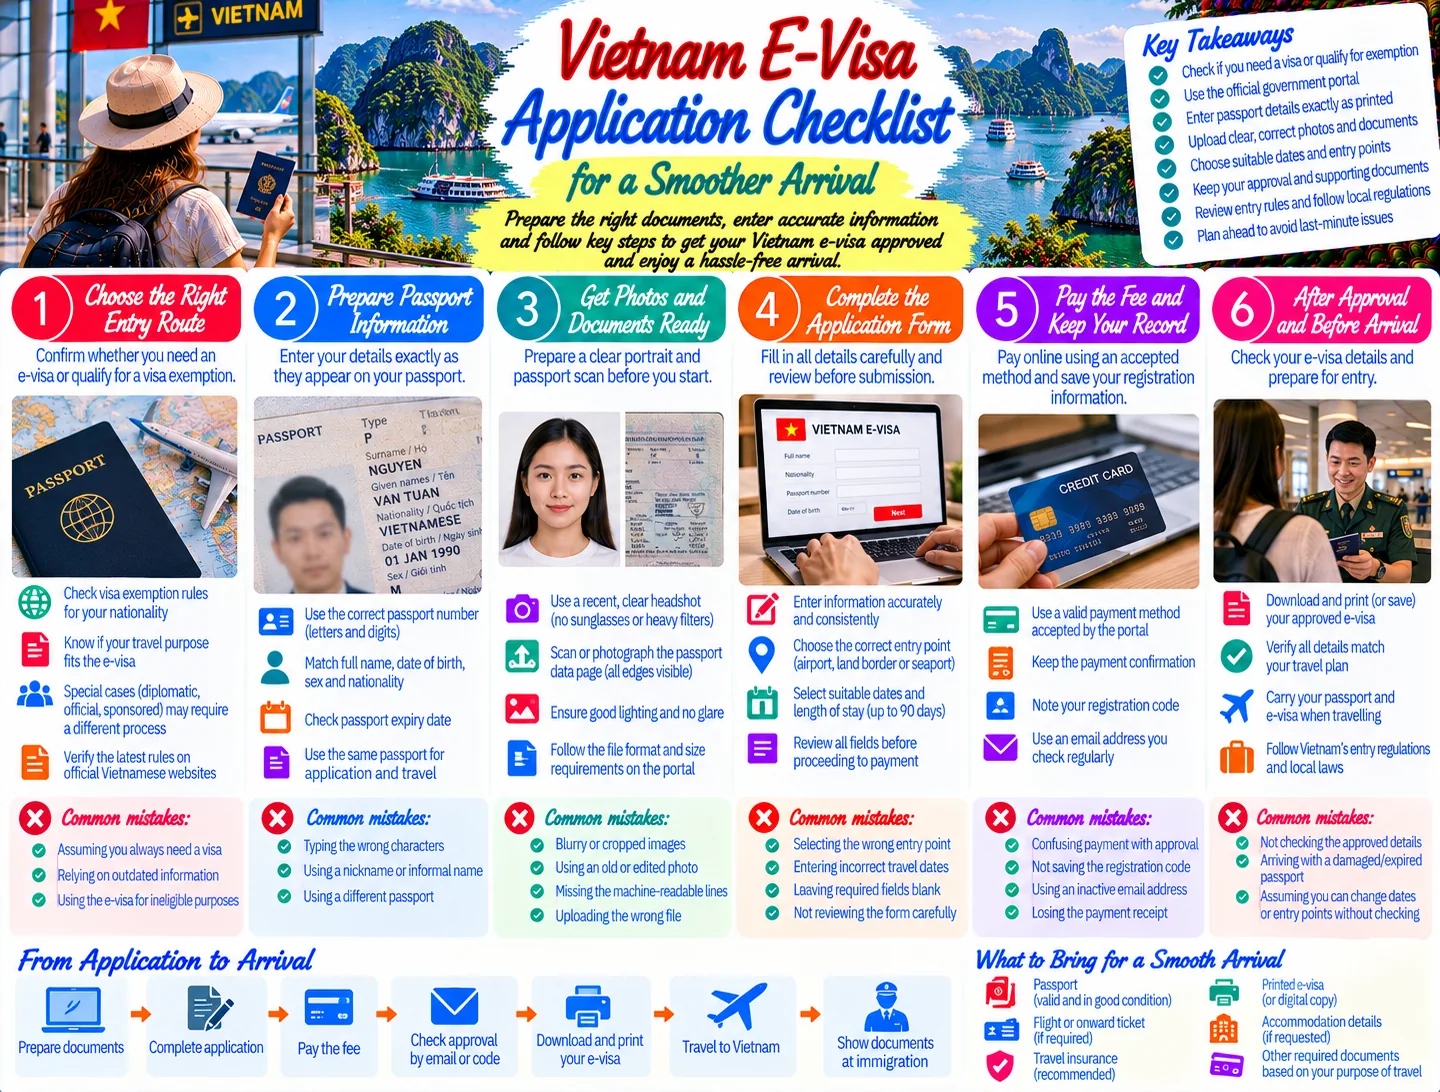
1. Start by choosing the right Vietnam entry route
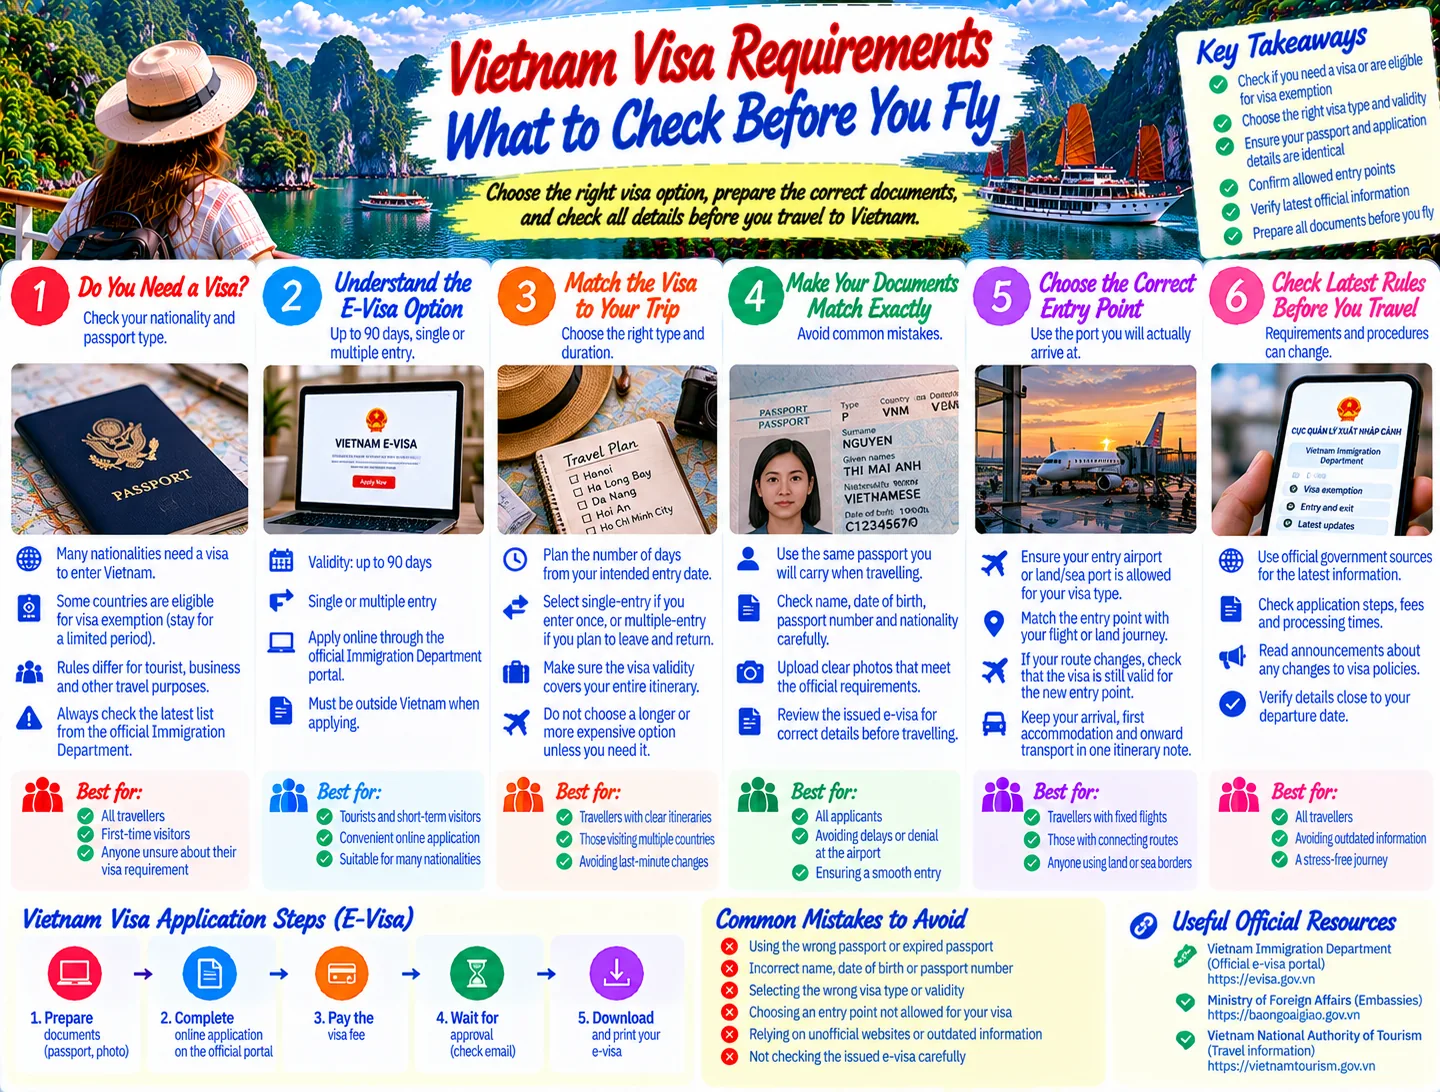
Before filling in anything, decide whether you need an e-visa at all. Vietnam’s official tourism guidance describes several entry mechanisms, including visa exemptions for eligible nationalities, the electronic visa, and a limited Phu Quoc exemption. Eligibility depends on your passport, intended stay, purpose, and route, so do not assume that a friend’s experience applies to you.
For many visitors, the e-visa is the clearest option because the official guidance says it is available to citizens of all countries and territories. The same guidance describes e-visas of up to 90 days and distinguishes single-entry and multiple-entry options. Choose the entry type according to your actual itinerary: a multi-country trip that leaves Vietnam and returns needs different planning from a one-way holiday.
If you are unsure which route fits, begin with the site’s Vietnam Visa & Entry category, then verify your personal case through the official Vietnamese portals. Do not buy a flight around an unconfirmed assumption about exemption eligibility.
2. Prepare the information before you open the form
Preparation reduces the chance of rushing through a field or copying an old detail. Put the following items together in one folder before you apply:
Your passport, open to the biographical data page.
A clear digital image of the passport data page.
A recent portrait photograph that follows the portal’s instructions.
Your intended arrival date and the date your permitted stay should begin.
Your first accommodation address in Vietnam, if requested by the form.
Your planned entry and exit points, based on the route you expect to use.
An email address that you check regularly.
A payment method accepted by the official application portal.
The Vietnam Immigration Department’s application page specifically instructs applicants to upload the passport data page and a photograph, then records a registration code for checking the result. That means the email and code are not minor administrative details; they are part of your retrieval plan. Save the code, payment confirmation, and submitted information together.
For a broader document review, compare this checklist with Preparing Your Vietnam Entry Documents. The aim is not to collect every possible travel paper, but to make sure the details that appear on your visa application are available and readable when you need them.
3. Complete the application as a passport transcription exercise
The most useful mindset is to copy the passport exactly, rather than enter the version of your name or birthplace that you normally use elsewhere. Check every letter, order of names, date, passport number, nationality, and document expiry date before continuing. Avoid adding punctuation, abbreviations, or informal spellings that do not appear in the document.
Review names and dates twice
Names can be especially easy to misread when a passport displays a family name and given names in separate fields. Compare the finished form with the machine-readable zone at the bottom of the page, but do not let that replace reading the main data page. Dates should be entered in the portal’s requested format, not the format you use at home.
Keep your itinerary consistent
Your intended entry date should leave room for processing and should make sense with your transport booking. If your route changes later, check whether the approved visa details still match the new plan before you travel. In particular, do not assume that any Vietnamese international airport, land border, or seaport can automatically be substituted for the point shown in your application or approval.
When a form asks for an address or contact detail, use a real, retrievable answer. Keep a copy of the final submission, because it is much easier to compare an approval against the submitted fields than to reconstruct what you typed from memory.
4. Submit payment and protect the registration record
The official Immigration Department page currently describes a three-step process: provide the required information and uploads, pay the e-visa fee, and use the registration code, email, and date of birth to check the result. It lists separate fees for single-entry and multiple-entry e-visas. Confirm the amount and payment screen shown by the official portal at the moment you apply, because online fees and procedures can be revised.
Do not treat a successful card charge as approval. Payment means the application has entered processing; it does not mean the visa has been issued. Keep the payment confirmation and note the registration code immediately. If the page gives you a downloadable receipt or confirmation, store it in both an offline folder and an accessible email folder.
Processing time is often discussed as if it were a guaranteed appointment. The Immigration Department page says applications are processed in three working days, while the tourism authority’s visa guidance gives a broader three-to-five-working-day orientation. Build extra calendar time around weekends, holidays, corrections, and any need to submit a new application. If your departure is close, do not rely on the shortest published estimate.
5. Check the approved e-visa before booking the final details
When your result is available, download it and read it line by line. Confirm that the name, passport number, date of birth, nationality, entry date, expiry date, entry type, and entry point match your actual trip. A visa can be valid in general while still being unusable for your planned route if one of those details is wrong.
A simple approval-letter audit
Compare the passport number character by character.
Check that the arrival date gives you the stay you expect.
Confirm whether the visa is single-entry or multiple-entry.
Match the approved port with your flight, land crossing, or cruise plan.
Check the passport you will carry is the same passport used in the application.
Print a copy and keep an offline digital copy.
The official tourism guidance advises travelers to verify the entry gate because the e-visa approval specifies the approved port. It also lists a large set of international airports, land border gates, and seaports. Treat that list as a planning reference, not permission to improvise at the last minute. If your transport changes, verify the new route against the current official information before departure.
For practical travel preparation beyond the visa itself, the site’s Essential Vietnam Travel Tips category is a useful companion. It can help you turn an approved document into a more complete departure checklist.
6. Build an arrival-day folder
On travel day, keep the documents you may need in your hand luggage rather than in checked baggage. Your folder can contain the passport used for the application, a printed e-visa, an offline copy on your phone, your first accommodation details, and onward travel information if relevant to your circumstances.
Printing is worthwhile even when you prefer digital travel. Phones run out of battery, airport Wi-Fi can be inconvenient, and a PDF that cannot be opened is not useful at a counter. Make sure the printed copy is legible and includes the complete visa page rather than a cropped screenshot.
Before leaving for the airport, check that the passport has enough remaining validity and blank pages for your trip. The official tourism guidance states that foreign travelers should have at least six months of passport validity beyond the entry date and at least two blank pages for entry and exit stamps. If your passport does not meet that threshold, resolve it before relying on the e-visa.
Also give yourself time to compare your real transport route with the approved entry point. A flight connection, a land transfer from a neighboring country, or a cruise itinerary can change the practical border gate even when the destination city stays the same.
7. Avoid the mistakes that cause the most disruption
Most preventable problems come from inconsistency, not from a complicated visa theory. Watch for these patterns:
Using a new passport after applying with an old one.
Entering a name differently from the passport data page.
Choosing the wrong entry date or forgetting that validity begins on the approved date.
Assuming a payment receipt is the same as an approved e-visa.
Flying through or arriving at a border point that does not match the approved entry point.
Relying on an agency or copied website instead of checking the official government domain.
Leaving the application code in an inbox you cannot access while traveling.
The Immigration Department warns that missing, incorrect, or unidentified information can cause an application not to be accepted. That is why proofreading is more valuable than trying to complete the form as quickly as possible. If you discover a serious error, seek current instructions from the official portal rather than assuming a handwritten correction or an email will fix the record.
If your Vietnam trip includes several cities, link your entry paperwork to your wider route. The site’s guide to trains, flights, buses, and other transport can help you test whether your arrival airport and onward connection leave enough flexibility.
8. A final 24-hour Vietnam e-visa checklist
Use this short review before leaving for the airport:
Passport is the same document used in the application.
Passport validity and blank-page requirements are satisfied.
Printed and offline digital copies of the approved e-visa are ready.
Name, passport number, birth date, and nationality match exactly.
Entry date, visa type, and validity period match the itinerary.
Approved entry point matches the actual flight, land, or sea route.
Registration code, payment record, accommodation details, and contact email are accessible.
Any recent change has been checked against current official guidance.
Do this review after your final transport change, not only when the visa first arrives. A correct e-visa paired with the wrong route can still create an avoidable problem.
Conclusion: make the document match the journey
A Vietnam e-visa application is easiest when every detail is treated as a match between your passport and your real itinerary. Prepare the uploads first, transcribe the passport carefully, save the registration record, allow more than the minimum processing window, and audit the approved document before departure. Then carry both printed and offline copies and confirm the entry point one last time. This simple process will not replace checking current official rules, but it gives you a reliable way to catch the errors most likely to disrupt an otherwise well-planned Vietnam trip.
JOIN THE CONVERSATION
Comments (0)
No comments yet. Be the first to share a thought.