Vietnam visa planning is easier when you treat it as a document-and-route check rather than a last-minute form. Before booking a flight, confirm whether your nationality needs a visa, choose the correct entry document, and make sure the details on your passport, application, flight booking, and accommodation plan agree. A small mismatch can create stress before departure even when the rest of your trip is ready.
This practical Vietnam visa and entry guide explains how to prepare for an e-visa application, what to check before travelling, how to think about airports and other entry points, and what to expect at immigration. Rules and portal procedures can change, so use the official Immigration Department sources linked below for the final check before submitting an application.
Start with the right Vietnam visa question
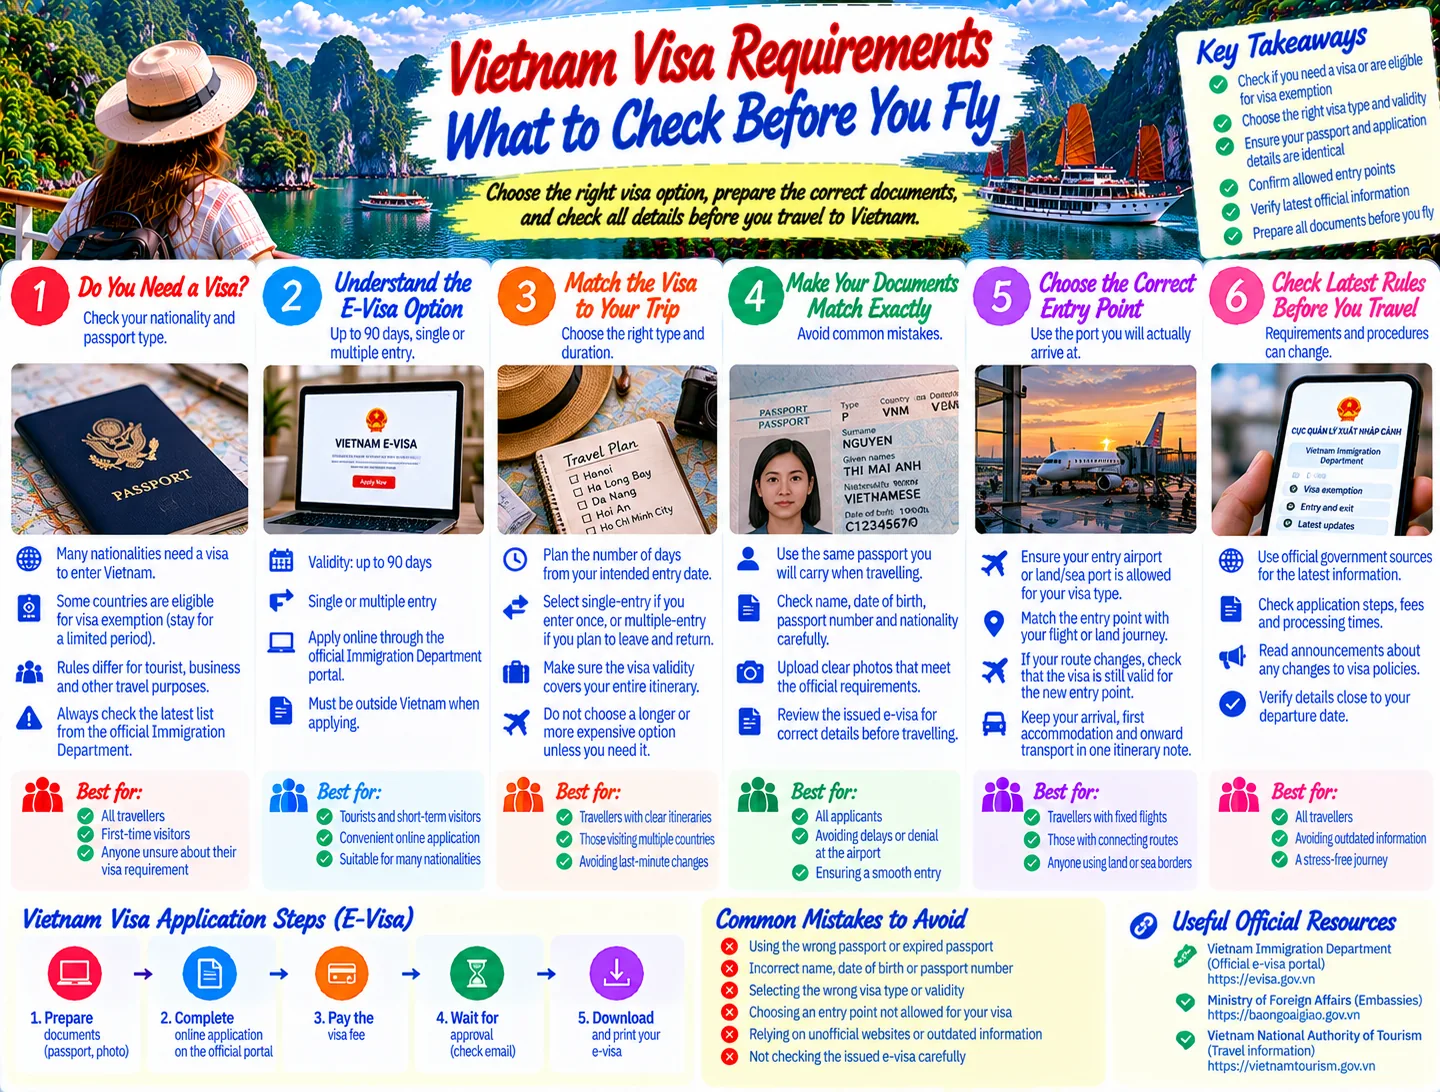
The first question is not “How do I get an e-visa?” It is “Do I need a visa for this passport, itinerary, and length of stay?” Vietnam has visa-exemption arrangements for some nationalities and visa requirements for others. Exemption conditions can depend on nationality, passport type, permitted stay, and the purpose of travel. They may also be revised, so do not rely on a friend’s previous trip or an old blog post.
If you do need a visa, the Vietnam e-visa is usually the main route for an independent visitor outside Vietnam. The Immigration Department describes the electronic visa as a document issued through its electronic system, with validity of up to 90 days and the possibility of single or multiple entry. That broad validity does not mean every application receives the same dates: the dates printed on the approved document control your travel.
Use the official portal rather than an imitation site. The Immigration Department’s former information page directs applicants to the newer official domains evisa.gov.vn and thithucdientu.gov.vn. Save the official domain in your notes, and be cautious with advertisements that make promises about approval speed or guaranteed results.
What to prepare before applying for a Vietnam e-visa
Check your passport first
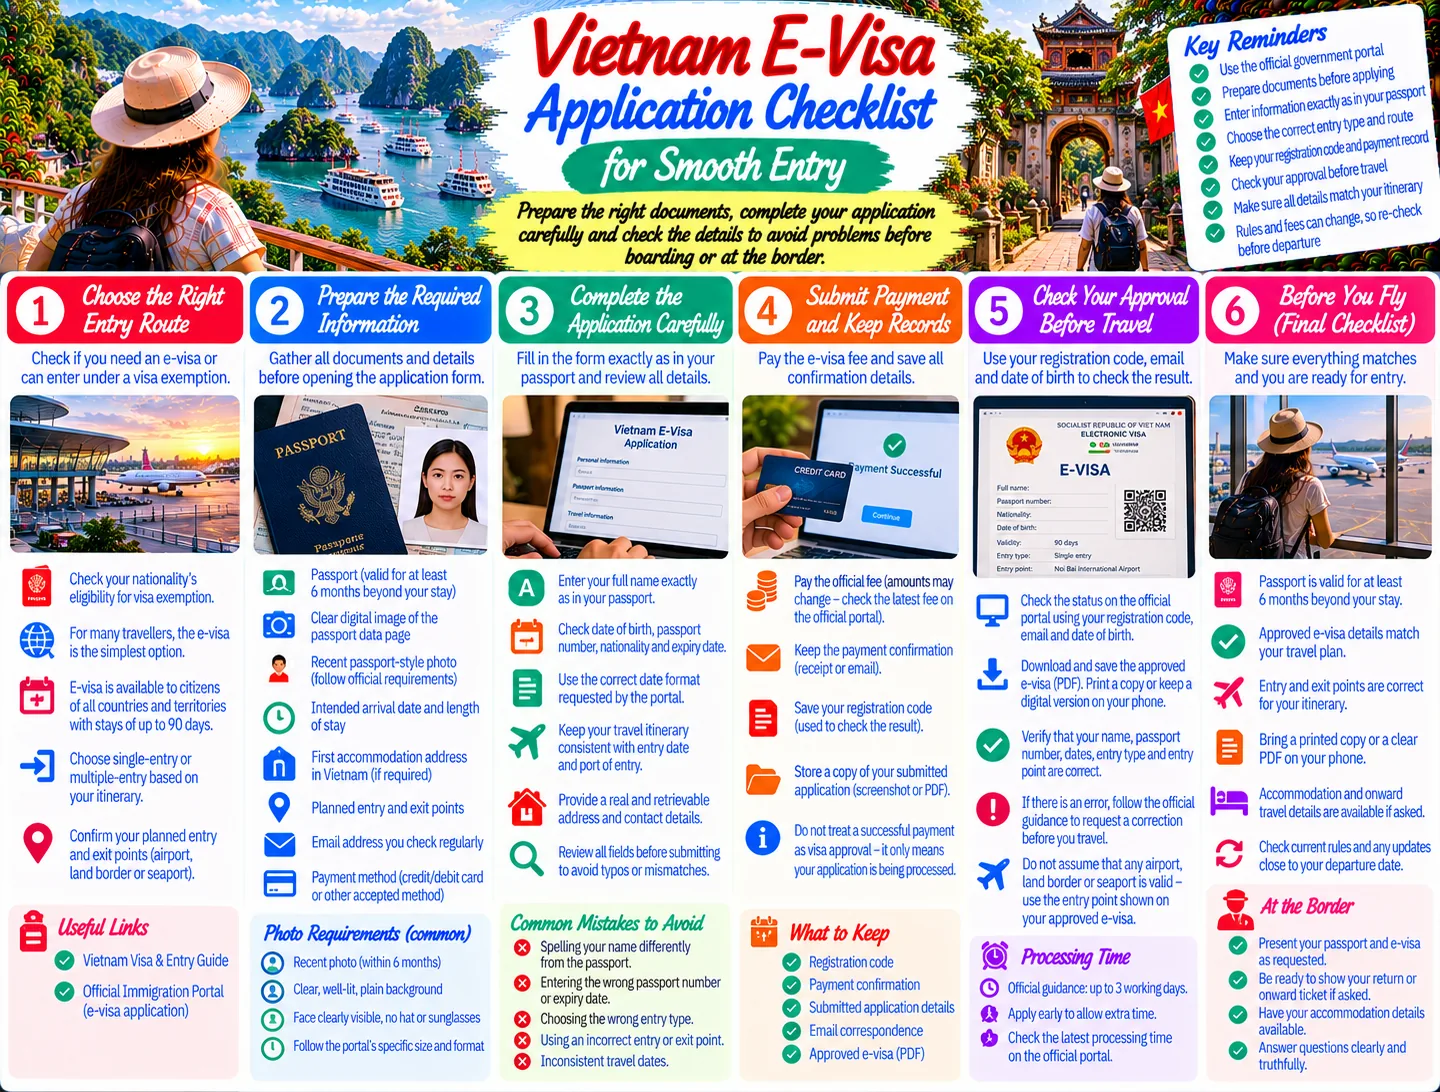
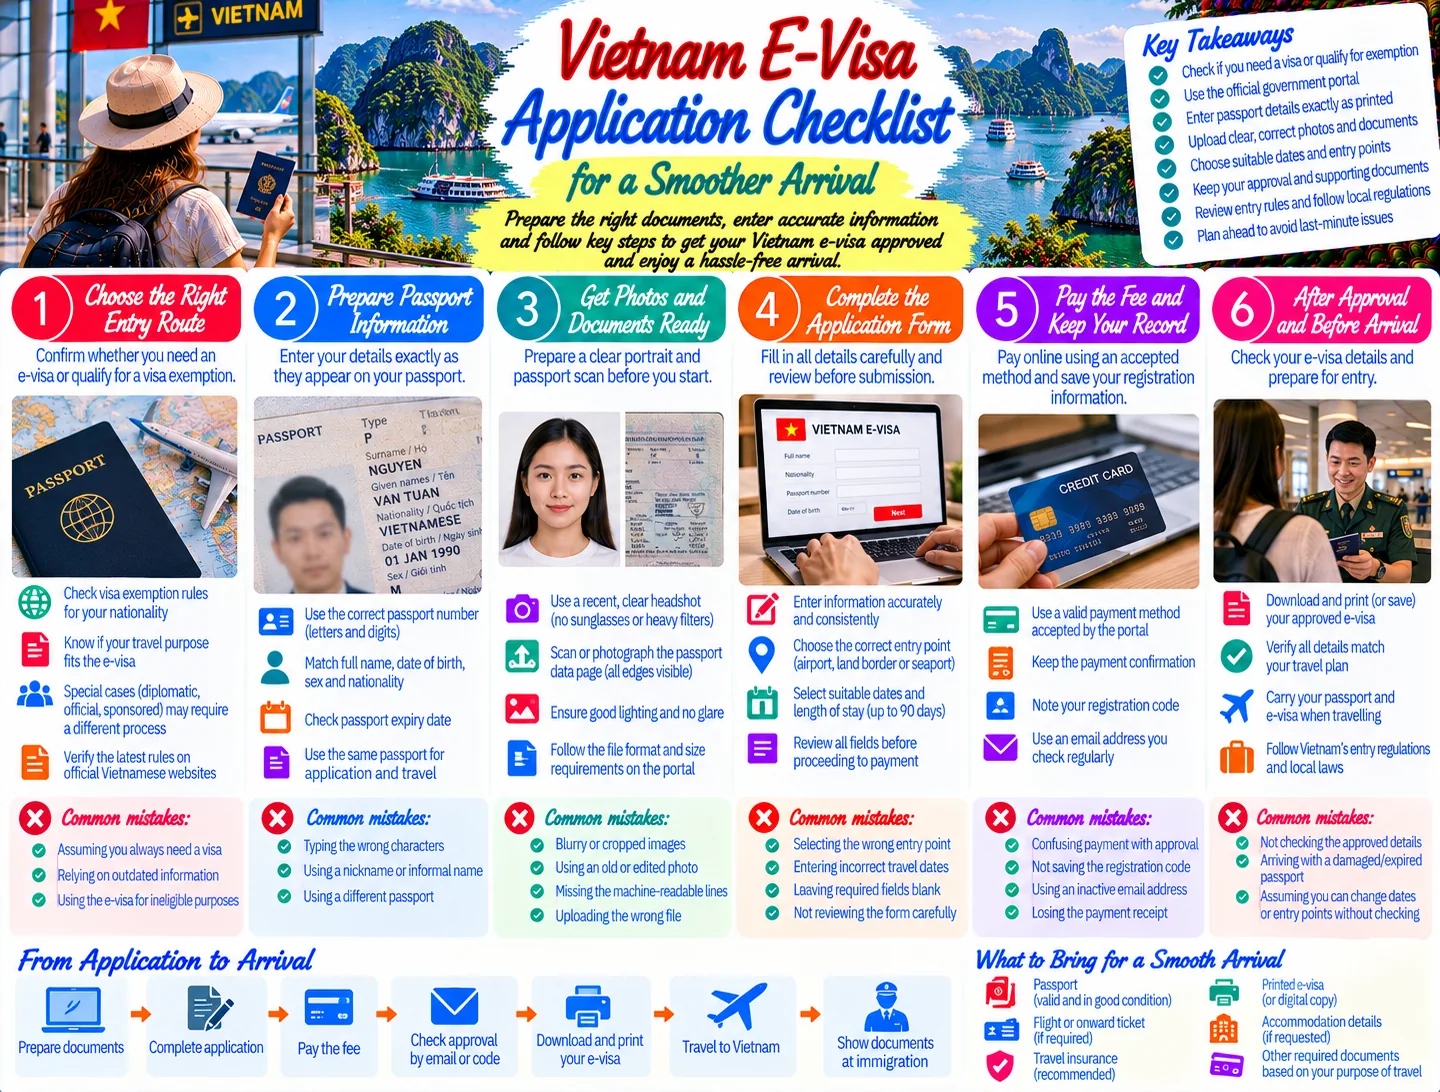
Your passport should be valid for the trip and have usable blank pages. Enter your name, date of birth, nationality, passport number, issue information, and expiry information exactly as shown on the biographical page. Do not shorten a name, swap the order of names, or use a nickname because it appears on an airline booking. The application should follow the passport.
Use a clear passport portrait and a suitable portrait photograph if the portal requests them. Avoid glare, cropped edges, sunglasses, hats, heavy filters, or images that make your face difficult to identify. Keep the original files and a copy of every submitted detail so you can compare the approved e-visa with your passport later.
Build a simple itinerary record
Have your expected arrival date, intended departure date, first accommodation address, and planned entry point ready. You do not need to turn a two-week holiday into a fixed minute-by-minute schedule, but you do need consistent information. If you plan to enter by air and leave overland, or enter once and return later, think through the route before selecting single or multiple entry.
Review the spelling of your hotel, city, and port carefully. If you are staying in more than one place, use the first address requested by the form and keep your full booking record separately. This is also a good moment to read Preparing Your Vietnam Entry Documents for a broader document checklist before you submit.
Choose entry details that match your real route
A visa is not just an approval to visit Vietnam; it is tied to the dates, entry conditions, and information shown on the document. Select an arrival date that gives you practical room around your flight. If a schedule change could move your arrival earlier, do not assume the visa will automatically cover the new date.
Be equally careful with the entry port. The official e-visa system provides a list of ports where foreign visitors may enter and exit using an e-visa. Compare that list with your actual airport, land border, or seaport. A flight connection may look simple on a map but still require you to identify the Vietnamese airport where you will pass immigration. If your itinerary includes a border crossing, verify the exact crossing rather than entering only the nearest province.
Multiple entry can matter for a regional trip that leaves Vietnam and returns during the same visa validity period. A single-entry document may be enough for a straightforward arrival and departure, but it is not a substitute for multiple entry if you plan to visit another country in between. Decide this before submitting because changing a route after approval may require a new application.
- Match the visa start date to the date you expect to enter Vietnam.
- Check that the selected port matches your flight, bus, train, or cruise plan.
- Choose single or multiple entry based on the whole route, not only the first flight.
- Keep the approved document accessible offline as well as in your email.
Submit carefully and verify the approved document
Before payment, read the entire application back to yourself. Compare every passport field character by character. Check the portrait, intended entry date, entry port, visa type, and email address. A wrong email address can prevent you from receiving the result even if the application itself is recorded.
The Immigration Department states that the e-visa fee is paid through an electronic payment gateway and is not refunded if an application is refused. That makes the pre-submission review especially important. Keep the application code, payment confirmation, and any reference information in one secure folder. Do not send those details publicly or share scans of your passport in an untrusted travel group.
When the result is available, download the approved e-visa and inspect it against your passport. Confirm the name, passport number, date of birth, validity dates, entry type, and entry port. If anything is wrong, do not quietly assume an immigration officer will correct it at the airport. Follow the portal’s official support or correction process and allow time for a resolution.
For first-time visitors, it helps to pair document preparation with a wider arrival plan. The guide Vietnam for First-Time Visitors: Start with the Basics covers the practical decisions that follow your visa approval, including how to turn arrival information into a workable first day.
Prepare for the airport or land-border arrival
Carry your passport and approved visa document in your hand luggage, not in checked baggage. Keep a digital copy on your phone and an offline copy in case airport connectivity is slow. It is sensible to keep your first accommodation address, onward travel details, and travel insurance information available too, even when they are not requested at every arrival.
At immigration, present the documents requested by the officer and answer questions plainly. Check the entry stamp or electronic record before leaving the counter. The permitted stay is governed by the dates and conditions recorded for your entry, not by how long you hoped to remain. If you notice an apparent error, raise it immediately while you are still at the checkpoint.
Airports can be busy at popular arrival times. Build a realistic buffer before a domestic connection, hotel transfer, or train departure. Do not book a tight onward connection on the assumption that immigration will take a fixed number of minutes. Your arrival experience can vary with passenger volume, staffing, document checks, and baggage collection.
If you are crossing by land or arriving by sea, use the same principle: verify the authorized port before travel and carry the document in a form that can be shown without relying on mobile data. A route that is valid for one entry point is not automatically valid for every border in the region.
Common Vietnam visa mistakes to avoid
Using an old rule
Visa policy, portal domains, exemption periods, and port lists can change. Search results may surface pages written under a previous rule. Treat them as background only and confirm the current instruction on an official Vietnamese government portal before paying or flying.
Confusing visa validity with permitted stay
The validity window tells you when the document can be used. It does not mean you can enter before the start date or remain beyond the authorized period. Read the dates on the approved document, then plan your departure around them.
Picking the wrong entry port
“Ho Chi Minh City” or “Hanoi” may be enough for a casual conversation, but an application needs the correct official port. Check your ticket and the portal’s list. This is particularly important for cruises, land crossings, and itineraries involving a connection.
Assuming an agent is the government portal
Commercial agencies may offer application assistance, but they are not the Immigration Department. Compare the domain, fees, privacy terms, and claims carefully. Never provide passport information to a site you cannot identify.
Leaving the application until departure week
Even a straightforward application needs time for payment, review, corrections, and schedule changes. Apply early enough that a mistake does not become an airport emergency. Early preparation also gives you time to adjust a hotel, route, or entry port without losing money.
Connect visa planning with the rest of your trip
Entry paperwork is one part of a larger travel plan. Once your dates and arrival point are stable, review transportation between the airport and your first base. The site’s Transportation in Vietnam category can help you compare the practical trade-offs between domestic flights, trains, buses, taxis, and pre-arranged transfers.
Your visa dates can also affect your budget. Airport transfers, an extra night caused by an early arrival, or a route that returns through Vietnam can change the cost of the trip. Use Vietnam Travel Budget to build a plan with room for those decisions rather than treating the visa as an isolated form.
Finally, keep a small arrival folder containing your passport copy, visa approval, accommodation details, insurance policy, emergency contacts, and booking confirmations. Store it securely, and keep the original passport with you. The goal is not to carry every document everywhere; it is to make the important information available when a border officer, airline, hotel, or transport provider needs it.
Final checklist before you fly
- Your nationality and passport type have been checked against current official guidance.
- Your passport details on the application match the passport exactly.
- Your e-visa dates cover the intended arrival and departure plan.
- Your entry type matches whether you will leave and re-enter Vietnam.
- Your selected port matches the actual airport, land border, or seaport.
- You have downloaded the result and saved an offline copy.
- You have checked the approved document for spelling and date errors.
- Your hand luggage contains the passport, visa, first accommodation details, and onward plan.
Vietnam visa planning becomes manageable when you verify the route as carefully as the form. Start with official guidance, submit consistent passport information, check the approved document line by line, and allow enough time for changes. With those habits in place, immigration is one clear step in the journey rather than the source of last-minute uncertainty.
JOIN THE CONVERSATION
Comments (0)
No comments yet. Be the first to share a thought.